Blogposts
Nahtloses Muster für deinen eigenen Stoff erstellen
Hast du dich schon einmal gefragt, wie das Entwerfen und Bedrucken von individuellen Stoffen funktioniert? Ich mich auch! Also habe ich mich damit beschäftigt und es gelernt. Ich werde meine Designschritte mit dir teilen und ein kostenloses Tool nennen, um dir den Einstieg zu erleichtern.
Die meisten Profis verwenden ein Vektordesignprogramm wie Illustrator von Adobe aber es gibt auch hervorragende kostenlose und kostengünstiger Optionen wie Inkscape.
Inkscape ist ein Open Source- und kostenloses Vektorprogramm. Du kannst auch einen Blick auf das Paket von Affinity werfen. Affinity Designer ist vergleichbar mit Illustrator, kostet aber nur einmalig im Voraus und nicht als monatliches Abonnement.
Dein Entwurf sollte eine hochauflösende Grafik sein, mindestens 300 DPI aufweisen und in einem für den Druck geeignetem Format sein. Am besten fragst du deinen Stoffdrucker, welches Format und welche Auflösung er benötigt. Das wird dir helfen, das beste Ergebnis zu erzielen.
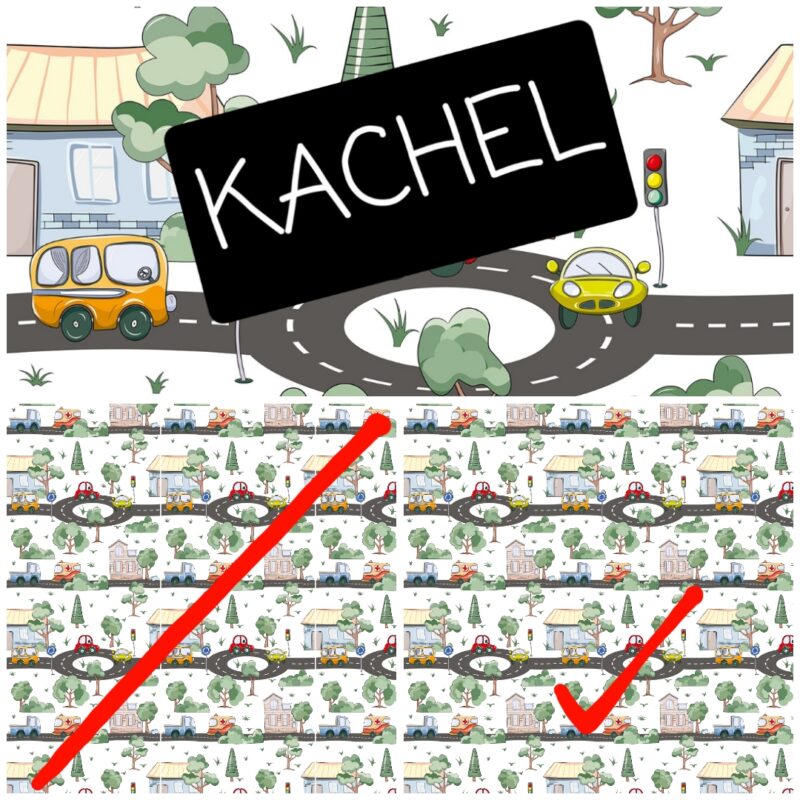
Ein nahtloses Muster wird manchmal auch als Kachel bezeichnet, weil es dann auch so gedruckt wird. Es wird wiederholt über die Länge und Breite des Stoffes „gekachelt“. Diese Kacheln ist der Grund, warum es wichtig ist, ein nahtloses Muster zu haben (identisch an allen Kanten); andernfalls würdest du die Kachellinien am Stoff sehen.
Wähle nun die Elemente aus, die du einarbeiten möchtest. Hier gibt es einige Onlineanbieter, wo du auf Komponenten zugreifen kannst. Oder du kannst die Elemente selbst entwerfen bzw. zeichnen. Wenn du dich für den Kauf von Komponenten entscheidest, vergewissere dich, dass du die richtigen Lizenzen hast, um diese auch zu verwenden.
Nachdem du deine Elemente zu einer Kachel zusammengesetzt hast, versuche sie selbst zu kacheln, um die Nahtlosigkeit zu überprüfen. Dies ist ganz wichtig!
Ich empfehle dir, auf Youtube nach DIY-Videos zu suchen, die dir dabei helfen, die Kanten so nahtlos wie möglich zu gestalten. Vektorprogramme verwenden exakte Koordinaten, um das Aufteilen deines Elements zu erleichtern und sicherzustellen, dass es nahtlos ist.
Custom Fabric Printing with a Seamless Design
Have you ever wonder what goes into designing and printing custom fabrics? Me too. So I learned what and how. I’ll share my design steps with you and some free resources to help you get started.
Most professionals use a vector design program like Adobe’s Illustrator, but there are excellent free and low-cost options like Inkscape. Inkscape is an open-source and free vector program. You can also look at Affinity’s package. Affinity Designer is comparable to Illustrator with a one-time upfront cost instead of a monthly subscription.
Your design should be a high-resolution graphic, at least 300 DPI, in a format suitable for printing. It’s best to ask your fabric printer what format and resolution they want. It’ll help you get your best result.
A seamless pattern is sometimes called a tile because of how it’s printed. It’s tiled repeatedly across the length and width of the fabric. This tiling is why it’s essential to have a seamless design (identical on all edges); otherwise, you would see the print’s tile lines.
Now choose your elements to incorporate. There are a lot of online resources to access components. Or you can design (or draw) your elements. If you’re choosing to purchase components, make sure you have the right licensing to use them.
After you’ve assembled your elements and built your tile, try tiling it yourself to test the seamlessness.
I recommend checking out Youtube for DIY videos to help you make your edges as seamless as possible. Vector programs use exact coordinates to make it easier to split your element and ensure it’s seamless.
